Friday, December 31, 2010

Progress

Well, it's going great so far. I got organized. And moved a lot around. I am just waiting for a top for my desk and I will make curtains for the closet.


Nice and organized.


Okay, imagine a top on the shelves.


I am pretty excited!!!

- Posted using BlogPress from my iPhone

Wednesday, December 29, 2010

Craft Room Redo

So for Christmas I got a serger. (it's type of sewing machine) I have nowhere to set it up. The only thing to do is redo my craft room.

BEFORE:


Yep, kinda disorganized...
I doodled a new set up and used it as mail art.


In the next few days I will post my progress.


- Posted using BlogPress from my iPhone

Received Mail Art

I got these this past week. I love mail art.


From Guido in Belgium


From Suzi in Ontario


From Douglas in California


- Posted using BlogPress from my iPhone

Monday, December 20, 2010

Received Art


I was so happy to find that I received this beautiful piece from a fellow IUOMA member. I thought I would share it because its just so awesome.


Saturday, December 18, 2010

French Memory Board

Here is the tutorial I promised you a while ago. I didn't get to it before my trip... sorry. Anyway, lets start!

Supplies:
canvas or wooden frame
cotton batting
fabric
staple gun
ribbon
buttons, needle and thread OR brads and X-acto knife
scissors
glue gun


Cut a piece of fabric and 2 layers of batting to fit your frame. Measure so there is 2 or 3 inches allowance on all sides.


Starting with the corners, fold fabric
over and staple to the frame. Continue all around.


Lay ribbon across in a way you like, I used very narrow ribbon so there are a lot of rows. If you use wider ribbon you won't need as many.
Alternate the directions to add interest.


If you are using buttons, arrange buttons on crossed sections and sew into place.


I used brads, I poked a small slit into the crossed sections and poked them through. Spread out tabs on the other side. Put a dab of hot glue to keep them from falling out.


And there it is!
A lovely, custom memory board.
Enjoy!

Thursday, December 16, 2010

Carving Stamps

I am really into personalizing. I try to make most things I use. I have been carving stamps for over a year. This same technique can also be called "linocuts" or "block printing". I reserve those terms more for large scale artist prints. Which can be very detailed and amazing. Although making my own stamps is amazing, I like to just call them stamps.

I like to use Speedball products. I picked them up at the Michaels store that I work at.
I am sure that these tools can be purchased online if you have trouble finding them.

Supplies:
Paper
Pencil
Speedball carving tools
X-acto knife
Carving block (these can be brown, pink, white or ivory)
*****You can also carve those white vinyl earasers
Stamp Ink

Step #1
Decide the size of your stamp. Sketch the design in pencil on a piece of paper.
***NOTE: you can draw directly on the block, BUT it will be reversed when its used AND its hard to erase if you mess up.

Step #2
Cut out the design. Use the back of the carving tool to burnish the design onto the block.

Step #3
Use knife and gauge to carve out the negative space. I like to work with a piece of paper under my block so I can easily get rid of the scraps. It can get messy. Rinse your block to wash off all tiny bits.
***NOTE: you can also carve out the positive space for a more solid block effect.
******NOTE: do one or the other

Step #4
Ink the stamp test it. There are may be more you need to carve away that you won't see until you test.

Step #5
Enjoy!!!!

Monday, December 13, 2010

Oh! Hello again.


Don't worry. I have been creating and blogging, just not here. Get up to date with my mail art!
Click the picture for the link...

Friday, December 10, 2010

Connected!


So I took a trip to visit my boyfriend at work. I flew and drove across a couple provinces to get here, the middle of nowhere. Although he is working the entire time I am here, it is nice to spend a couple of hours a day with him. Its like a vacation from everything. I have a giant bin of craft supplies and lots of time to spare.
As you can tell from the picture, most everything is covered with snow. Under that snow are fields. I loved how the sun broke through the clouds for a brief moment. Before that the sky and ground blended together seamlessly.
I will post my creations soon! We just got internet today at the place we are staying. I am so happy to be re-connected.
It took me hours yesterday to post on Mail Art 365 from my cellphone.
Now, I must venture out into the cold.

Monday, December 6, 2010

Getting ready...


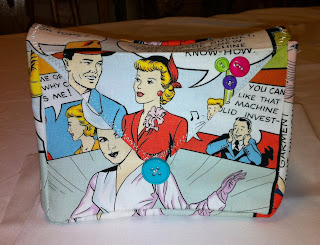
Yep, I am getting my mail art ready to go everywhere with me! I have been planning to put this together since I started making mail art. At first I was looking for something in stores, but nothing worked. I used the leftover fabric from the dress I made for an 80's party months ago. I
love it and I have a lot left still.


It is kinda boxy with an envelope style with a button closure. There is velcro on it as well, to keep it more secure.


Some of the things inside are:
*pre-cut 4" by 6" card stock, doubled
*stencils
*scissors
*glue stick
*double sided tape
*podge
*paint brushes
*couple stamps
*ink (for stamping and writing)
*calligraphy pen, extra nibs
*waterproof felt markers

Saturday, December 4, 2010

Holiday Baking


I am getting some holiday baking done. Bringing these tasty treats to the annual roller derby Christmas party. It should be a good night. A few drinks with a bunch of awesome ladies, oh there are a few guys too. If you are looking for a good recipe check out allrecipies.com that's where I got this one. I like to eat mine plain. Although decorating is fun, I am leaving that for next time. I have a lot more to do still.

Friday, December 3, 2010

Dec 3rd...


This is the view from my craft room window. Burr... I am not looking forward to going out there today.

I already got a little surprise today. A beautiful hand drawn post card from my friend Pepperistic. Its lovely. I am going to make a french
memory board to display my mail art in the next few days.

Thursday, December 2, 2010

Long Day!


I have been making mail art all day! I have sent out 7 pieces today. It is so much fun. The weather was terrible out today. So much misty fog making it icy out. I left my house briefly, spent the rest of the day cozy warm in my craft room. I did not want to venture out into the coldness. Its beautiful to look outside the window, its a different story being out there.

Wednesday, December 1, 2010

Mail Art 365!


So I signed up to Mail Art 365. I am excited for the challenge. I blog there about the art I make and receive. If you want to know more about that, follow it too. Here is a link: Mail Art 365
I have been practicing calligraphy. I hope it adds a special touch to my mail art.

Tuesday, November 30, 2010

Post Crossing


Hey! I got an e-mail from Post Crossing today saying my postcard made it to Taiwan! So exciting. It is the top one with the angel in the picture.
Mail art is so fun!

Monday, November 29, 2010

Hello!


Yep, I am starting a blog. I have so many interests and other than little blurbs, I feel like I would be flooding Facebook with too much stuff. I will keep you up to date with my creations. Should be fun!

I have been making mail art lately. I am trying to make some daily. I have signed up to a few websites. Mail Art 365, Postcrossing, Mail-Art, and found some ramdom blogs by googleing.